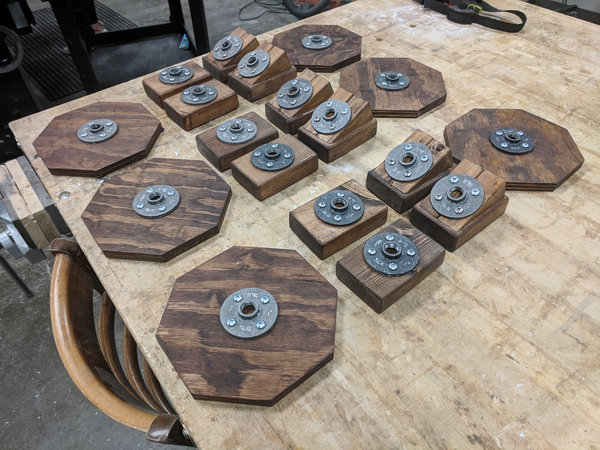
handstand canes
I made some handstand canes. I think the term for this style is properly handstand pedestals, but “canes” is the universally recognized term. Regardless, here are some notes on how I did it.
This page from Sheila Brothers and this one from Lost Art of Hand Balancing were helpful starting points.
components
I used 2x4s, ¾” plywood, pipe nipples, floor flanges, and screws.
Your local hardware store might have these components, but they’ll probably be more expensive. The prices on Amazon tend to fluctuate. Sometimes they’re cheaper in a multi-pack, and sometimes they’re cheapest as add-on items. Nipples tend to come in multi-packs more than flanges, which is the opposite of what I want, but oh well. You might be able to sell the extra nipples to local yogis making their own and save everyone a bit of money.
Pipe fittings are not all the same. Get galvanized nipples so they’re not greasy and don’t corrode. “Black iron” will be either greasy or need stripped and sealed to be used. You can strip it with acetone and seal with Minwax finishing wax if necessary. These are the sources I used to derive that process:
- An infographic from PipeDecor.
- A YouTube walkthrough from HandMadeModern.
- A thread from r/DIY
- A thread on FineHomebuilding.
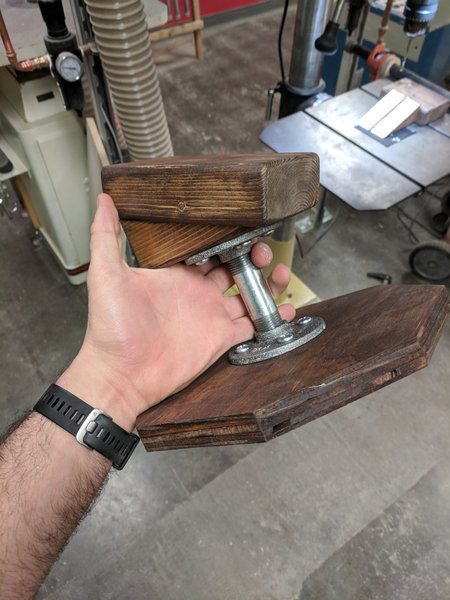
¾” flanges (w/ nipples) will be basically the same width as a 2x4, meaning they’re hard to align well. ½” flanges and nipples are what I used. I use only very-short and fairly-short canes at the moment and ½” feels very sturdy but I have no idea how they’ll hold up over time, or perform with longer nipples, or for a heavier person.
I did some quick testing of nipples of length 4, 12, 18, and 24 inches with 8” octagonal bases. 12 was the tallest I felt safe using without making a wider base.
construction
Drill pilot holes one at a time, and sink all screws partially after drilling each hole and before tightening any of them completely. Just like putting a wheel back on a car, tighten in a star pattern, not a circle Get your pilot holes placed correctly or they’ll be basically impossible to correct without a drill and some clamps. If you have access to a drill press, I recommend using it for all pilot holes, especially if making angled grips.
Cut the bases into octagons, because squares are unnecessary (and hard to keep aligned if you’re making swappable grips) and circles are hard to cut. And octagons are cool.
Get a lint free cloth to use in polishing the waxed pipe fittings, if you couldn’t get galvanized fittings. I tried shammy towels, dish rags, and t-shirts. All were bad.
I used pan-head #14 sheet metal screws. Note that the size may be listed as ¼ (inch) instead of #14. Pan heads are meant for attaching something rigid to wood, rather than sinking flush into a surface. #14 is a pretty wide screw, which is generally good for stability but also is necessary to have a wide enough head for the mounting holes in the flanges.
I played around with different angles of grips and attempted to measure the angle of our hands in a comfortable hand-to-hand or tucksit position. I arrived at 22.5 degree grips. I cut a bunch of wedges off of 2x4s with a miter saw and use pairs of them under another rectangular 2x4 for angled grips, with the flange attached to the wedges.
The 11” nipples that I ended up using are high enough to use for practicing non-inversions like tuck sits, L sits, and straddles.
use These are just comments based on my usage of these particular canes. I’ve used other canes almost never in my practice. It seems prudent to always keep your force directly down through the bases. The floor isn’t going to slide or topple from under you if you have some horizontal force while kicking up, but obviously will, after your force vector isn’t pointing through the base anymore. This is more relevant for the taller nipples, and I caution anyone who helps spot while using this to keep the flyer’s force vertical.
I use plain plywood bases on hard floors and have never had an issue with sliding. Others have been less certain of that and we’ve found that a yoga mat under the bases works well. You could get a cheap yoga mat and cut it to fit the bases and attach with some spray adhesive to make them permanently sticky.
I found that I can walk down to the floor from canes with 3” or 4” nipples pretty reasonably. When I started practicing without a spotter or wall, that was reassuring. I worked my way up to twisting out on the short canes rather than walking my hands down, and then did some spotted twist outs of the taller ones until I was comfortable doing that unspotted.
If you’d like to comment on this article with improvements or questions, head over to the Google Docs version.

